Difference between revisions of "Documentation:Unreal Engine Vehicle Variety Pack"
(→Pivot points... when going to UE4) |
(→Pivot points... when going to UE4) |
||
| Line 61: | Line 61: | ||
The trick here is to position the mesh, in Blender, precisely you you can rotate the window with the door... | The trick here is to position the mesh, in Blender, precisely you you can rotate the window with the door... | ||
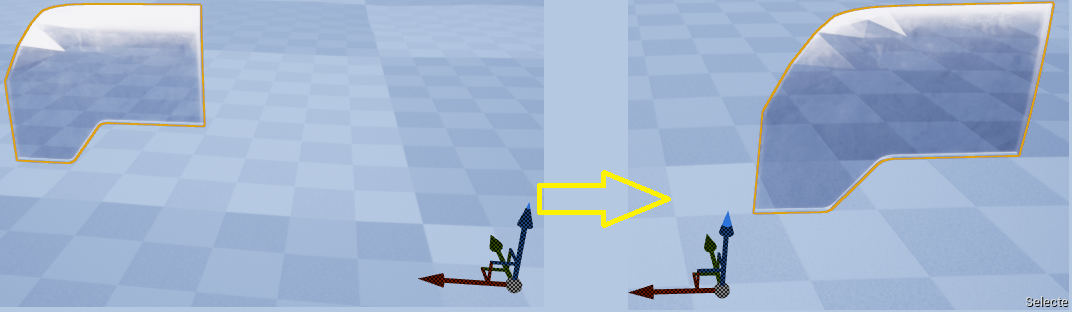
| − | + | In your first attempt, this is how it will look in UE4 - but you want the transform/rotation/size gizmo to sit like you see it to the right! | |
[[File:UE4-Truck-Window3.png]] | [[File:UE4-Truck-Window3.png]] | ||
| + | |||
| + | |||
| + | To do this you need to go to Blender and position your mesh close to position 0, 0, 0 - oddly enough, the pivot point in Blender has no effect on the one imported to UE4. | ||
| + | |||
| + | However since we want the window to move '''with''' the door, you want the rotation point to sit to the left of the window. Tip: You can simply find the exact position when you have the left door positioned correctly to it's rotation point, you can then position the window "on top" of the door and save the two in separate FBX files. | ||
| + | |||
| + | The process of getting the left front door selected is rather tricky - so I suggest you start with the windows (do both) and then move on to practice on the back-doors! When you get the hang of this it is just work-work-work! The Blender navigation, and selection, is not easy... ? | ||
| + | |||
| + | You can save the same Collection for each part you separate out, then duplicate... and delete the stuff you do not need. In the end you will have one collection holding all the parts and several other collection holding the parts. Naturally when you are finished you duplicate the collection one "last" time and delete all the small parts.. so you have the Truck body in it's own collection. | ||
Revision as of 20:20, 9 March 2020
Your character should have some kind of transportation - and UE4 comes with some help Vehicle Variety Pack. However I wanted to get access to the car and to the interior of the box van... Since you need to use Blender for that, I think this gives us a better way of learning a bit about getting props, using Blender in combination with UE4.
This is the tasks I intend to describe:
- Getting SM_Truck_Box into Blender! and split the mesh into separate parts!
- Saving the separate parts
- Failed experiment, with morph targets
- Pivot points... when going to UE4
- Save the work and import to UE4
- New blueprint for the Truck
The end result should be that you can open back doors of the Truck, also you can open the left front door and you can roll down the left window. These are some screen shots of that:


Getting SK_Truck_Box into Blender and split it!
You should be able to install the package into UE4 and from there you go to Skeletons and export SK_Truck_Box. You can probably get even better results using SM_Truck_Box, but I did the SK_ version.
Go to Blender 2.8, and import the skeleton in it's separate collection. Use the standard import setting for this. Save the .blend file in a separate folder! Duplicate this collection and start working on the
The trick here is that you should now go to edit mode and select all parts that you want as a separate mesh in UE4. Please start with the from left window! This can be rather tricky, and it will be very tricky doing the front door. These are the shortcut you can use for selection:
- Left-mouse+shift clicks selects (Vertex/Edge/Face) - the selection is highlighted
- Ctrl-+ selects what is connected to the current selection, this is not always logic to me but it seldomly fails.
- H-hey, hides your currently selection - when you have something hidden the H-key the visible selection to that.
- Alt-H, unhide showing your current selection
- Ctrl-Z will undo selections etc. (the result you see is not always logic)
In the end you can jump between H and Alt-H to ensure that you have the full selection.... remember to save once in a while! When the window is selected correctly you should be able to do this:


Notice that the entire Mesh for the window is two layers, so you first select the outside layer then the layer. And take well care that you do not select some of the internals!
Now this is the important part, you can now split-up the mesh like this:
- Still in Edit-mode, use the Mesh-menu/Separate/Selection option... This will split up the mesh so you have the window in a separate part. Rename the Window part to window_left.
- In the current collection you can now hide/see the window/Truck using the eye icons.
- Duplicate the collection, and for the new collection delete all the parts that is not under the the window.


IMPORTANT: Rename the item in the hierarchy to Vehicle_ROOT, and export the entire thing as an FBX.... using the same export settings you used for your makehuman FBX - but scale should be changed form 0.1 to 1.0.
This is a good time to save your .blend file!
Failed experiment, with morph targets
The end result should be that you can open/close windows and doors. My first attempt was using morph-targets. Like whit the Makehuman characters this require that you do two truck collections and select/shif t-selec the two meshes and "join as shapes" - the selection process is much the same, but the results was very poor, as the doors do not animate to scale, they actually morph, not very surprisingly!
Pivot points... when going to UE4
When you import the Window you must realize two things:
- Invent a name standard for your meshes and your files. You will have a lot of FBX files, and you need to keep a bit of track of what you did and how you imported all of your assets.
- Your Window will not have the correct pivot point!
The trick here is to position the mesh, in Blender, precisely you you can rotate the window with the door...
In your first attempt, this is how it will look in UE4 - but you want the transform/rotation/size gizmo to sit like you see it to the right!

To do this you need to go to Blender and position your mesh close to position 0, 0, 0 - oddly enough, the pivot point in Blender has no effect on the one imported to UE4.
However since we want the window to move with the door, you want the rotation point to sit to the left of the window. Tip: You can simply find the exact position when you have the left door positioned correctly to it's rotation point, you can then position the window "on top" of the door and save the two in separate FBX files.
The process of getting the left front door selected is rather tricky - so I suggest you start with the windows (do both) and then move on to practice on the back-doors! When you get the hang of this it is just work-work-work! The Blender navigation, and selection, is not easy... ?
You can save the same Collection for each part you separate out, then duplicate... and delete the stuff you do not need. In the end you will have one collection holding all the parts and several other collection holding the parts. Naturally when you are finished you duplicate the collection one "last" time and delete all the small parts.. so you have the Truck body in it's own collection.